Return to home... |
Onion skinning is the concept of being able to see previous and/or following frames as you work on a different frame. This allows you to reference these other frames as you draw, to ensure consistency, smooth motion and ensuring you stay on model.
Within traditional animation, utilising paper and pencil, you would use a light box with a pegbar attached. This would allow you to see whatever frames you placed below your current frame.
There are usually a few different ways that onion skinning is implemented within modern software. Some software has an approach that uses "handles" to show how many frames close and away from the current frame to show. Other software has an approach more flexible, which allows you to select certain frames to display, filter those frames to only be certain drawings (whether that be key drawings, breakdowns, inbetweens, any and all).
Toon Boom Harmony has both approaches mentioned above implemented, giving you the choice to pick what is suitable to your current workflow.
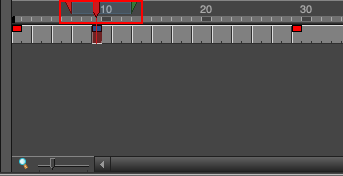
The standard onion skin mode uses "handles" or brackets, to tell the software how many frames ahead and behind it should show. Any repeated frames will show per frame the bracket is covering.
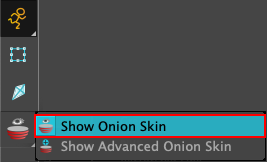
To enable the onion skin, hold down the button within your tools toolbar and select Show Onion Skin.
The handles to adjust how many frames are shown is found within the timeline. To adjust these, click and drag either of the handles left or right.
If you would like more flexibility as to which frames or drawings are shown within your onion skin, the advanced onion skin covers these options.
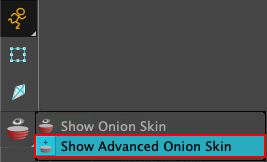
To enable the advanced onion skin, hold the mouse button down on the onion skin button within the Tools toolbar and select Show Advanced Onion Skin.
Alternatively, to open the advanced onion skin, open the Onion Skin window (by opening your menu bar and selecting Window > Onion Skin) and then click the middle button at the top of the window.
The additional flexibility with the advanced onion skin includes:
These additional features within the advanced onion skin mode brings all the flexibility of the traditional animation onion skin workflow to the digital realm.
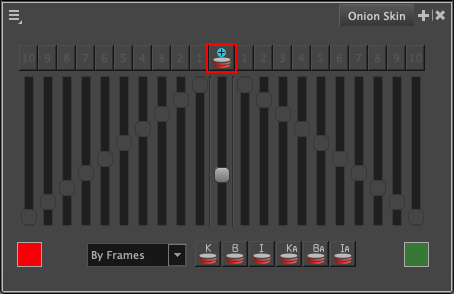
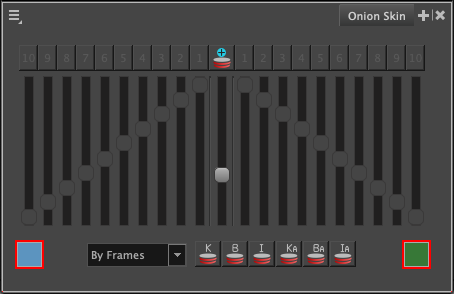
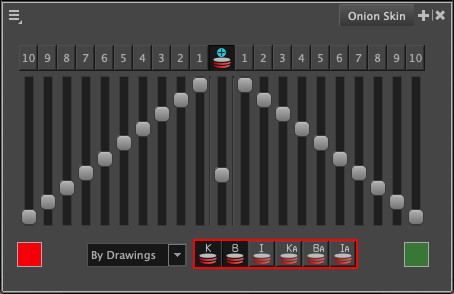
To adjust which frames are shown for the advanced onion skin, select the relevant frames via their button across the top of the window. The left-hand side represents your previous frames, whilst your right-hand side represents next frames. The number represents which drawing or frame is sampled (more detail on this is given in By Frames versus By Drawings).

_Note that the onion skin handles within the timeline do not show with the advanced onion skin enabled._
There are a few different ways to adjust your onion skin opacity.
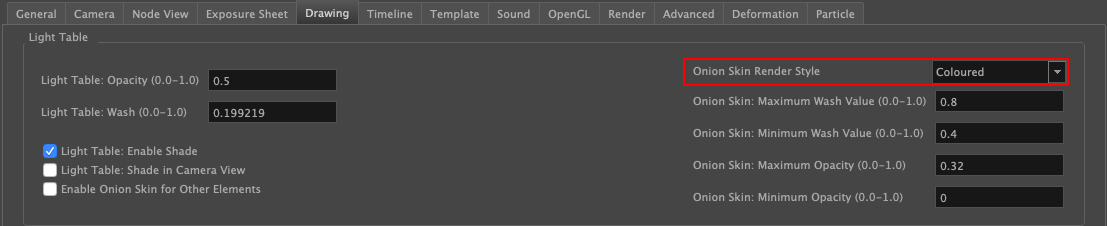
Within your camera or drawing views, you can enable either the Camera View or Drawing View toolbars. By default, these should be enabled. Within these, you will have the Top Light button. By clicking this, you will be able to adjust your settings for the onion skin, along with a few other settings for the light table.


Alternatively, you can adjust it within the Onion Skin window. This isn't shown by default, so go to your menu bar and select Window > Onion Skin. The middle slider will allow you to adjust the onion skin opacity. Note that if you are using the standard onion skin, most of the options within this window are disabled.
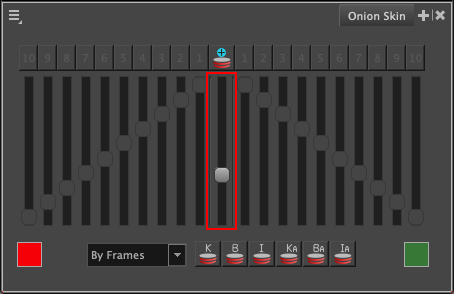
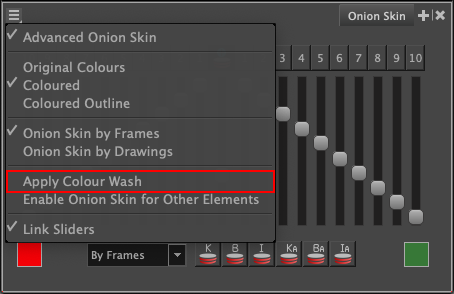
Within the advanced onion skin mode, you can adjust each opacity slider separately, or link them together. The setting to link the sliders together is under the Onion Skin window, in the hamburger menu as Link Sliders.
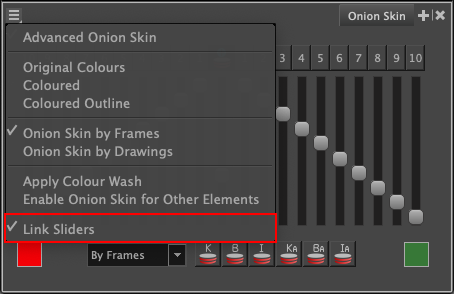
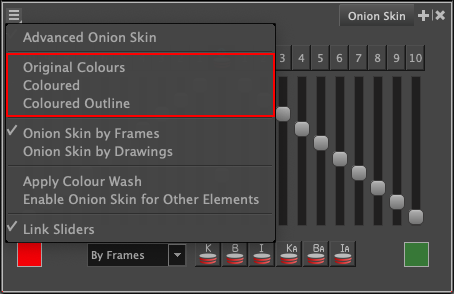
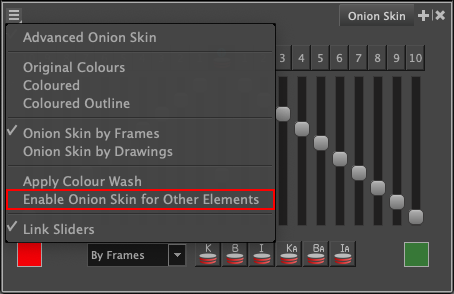
The onion skin can show in three different ways. This can be adjusted by using the Onion Skin window (opened via the menu bar, Window > Onion Skin), within the hamburger menu in the top left. These options include;
_(You can also adjust the above settings within your Preferences window, within the Drawing tab)._
To adjust the colour of your onion skin, go to your Onion Skin window. Within this window, you will have two buttons; one button bottom left will control the previous frames colours, and one will control the next frames colours. To adjust these, double click on one of these buttons and a colour dialogue box will appear.
Displaying the onion skin with a ligher, less saturated colour than those selected is also possible. Within the Onion Skin window, click the hamburger menu and select Apply Colour Wash. The further away the frame is from the playhead, the more washed out it appears. The minimum and maximum settings for this setting are found within the Preferences window, under the Drawing tab.

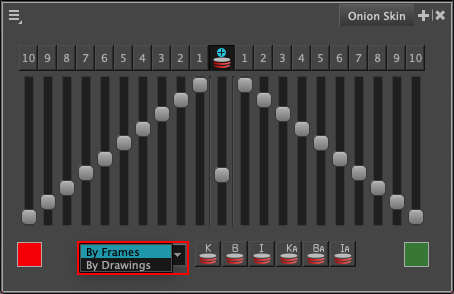
Within the Onion Skin window, there is a dropdown that lets you select either By Frames or By Drawings.
By Frames will sample whichever drawing is on the relevant frame that is a certain number of frames away. If there are repeated frames/drawings, these will show as many times as selected. This works very similarly to the standard onion skin, only that you can specifically show/hide a certain combination of frames that are around the playhead.
By Drawings, on the other hand, will sample the nearest different drawing substitution. This means that exposure of a frame is completely ignored, and instead focuses on the actual drawing substitution itself.
Both of the above options are extremely helpful for different users.
_These settings are generally used for the advanced onion skin. This setting can still be changed within the standard onion skin, however keep in mind that changing it to By Drawings for the standard onion skin will remove the ability to see the handles on your timeline. You will be required to use keyboard shortcuts or toolbar buttons to adjust which frames are shown._
Marking drawings is not a feature exclusive to using the onion skin. However, due to its utility within the advanced onion skin, this guide also covers how to mark drawings and use that within the onion skin.
Drawings can be marked as Key drawing, Breakdown, In-between, Retake key drawing, Retake Breakdown and Retake In-between. These will give the frame a colour on the timeline to mark them as such, and will also give an icon within the X-sheet to denote them as such.
To mark a drawing:
Drawings > Mark Drawing As > [Type].Mark Drawing As > [Type].Mark Drawing toolbar (which can be added by right clicking in a toolbar area and selecting Mark Drawing), and clicking the relevant type of drawing.
If you are using the By Drawings mode, you can filter the type of drawing that is sampled via the onion skin. To do so, you can select the relevant frame type within the Onion Skin window.
Alternatively, via the Onion Skin toolbar (added by right clicking in a toolbar area and selecting Onion Skin), you can filter the drawings that are shown.

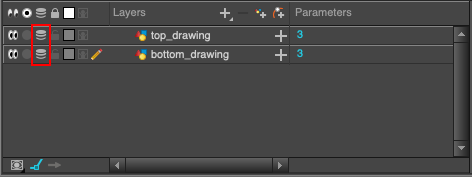
In some animation workflows, you will have an animation spread across multiple layers. You may need to show the onion skin for these other layers too.
Within Toon Boom Harmony, the onion skin will show on whichever layer is currently selected, plus any additional layers you may add to the onion skin.
If you want to see additional layers with onion skin activated within your camera view, you can add the relevant layer to the onion skin. To the left of the drawing on the timeline, there is an onion skin icon. Any layers with this activated will show the onion skin, in addition to the currently selected layer.
Within the drawing view, you can enable other layers to be shown. Within the Drawing View toolbar, you must first enable the Show Light Table option to show other layers. The layers that are shown is determined by anything active, and doesn't follow any specific composite, display or write nodes.

Next, you must select the Enable Onion Skin for other elements option. This is found within the Onion Skin window, in the hamburger menu.
Enable Onion Skin for other elements can also be found within the Onion Skin toolbar.

Toon Boom Harmony users will be familiar with the Animate Current Frame button within the Tools toolbar. This option refers to animating anything in regards to the transform tools. By holding down this button, you are given the option for Animate Onion Skin Range.
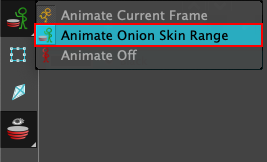
This option will apply any transform changes to the region set by the onion skin. If there are no keyframes present already, it will automatically create the relevant keyframes. If keyframes are present, then it will keep the current keyframes and adjust the transforms within these keyframes as required.
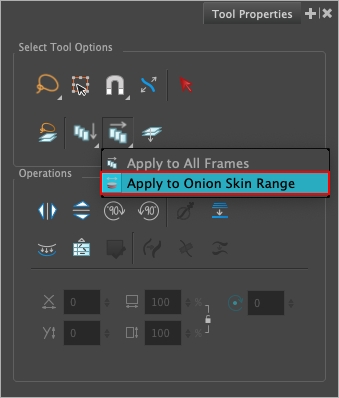
Within some tools, such as the Select tool, there is an option to Apply to Onion Skin Range. This will apply any changes to the drawing data itself to the entire range of the onion skin. Click here to learn more about the Select tool.
This document doesn't outline the shift and trace tool, and the article is currently under production. The relevant video is below, and the article will be linked once complete:
For usage with the onion skin, there are many default keyboard shortcuts. There are also additional shortcuts that aren't assigned by default. To assign a keyboard shortcut, go to your menu bar and select the Keyboard Shortcuts option.
Below are all the relevant shortcuts:
Main |
Keyboard Shortcut |
Show/Hide Onion Skin |
Alt+O |
Enable onion skin on current layer(s) |
Keyboard Shortcut |
Add all to onion skin |
Alt + Shift + O |
Add to onion skin |
Shift + S |
Remove all onion skin |
Ctrl + Shift + O |
Remove selection from onion skin |
Not assigned |
Remove unselected from onion skin |
Not assigned |
Toggles |
Keyboard Shortcut |
Animate onion skin range |
Not assigned |
Toggle onion skin drawing mode |
Not assigned |
Apply tool to onion skin range |
Not assigned |
Set ranges to 1/2/3 |
Keyboard Shortcut |
Onion Skin: 1 Next |
Ctrl+1 |
Onion Skin: 1 Previous |
! |
Onion Skin: 2 Next |
Ctrl+2 |
Onion Skin: 2 Previous |
@ |
Onion Skin: 3 Next |
# |
Onion Skin: 3 Previous |
Ctrl+3 |
Onion Skin: No Next |
Ctrl+ |
Onion Skin: No Previous |
~ |
Set ranges to 1/2/3 |
Keyboard Shortcut |
Onion Skin: Add 1 Next |
Not assigned |
Onion Skin: Add 1 Previous |
Not assigned |
Onion Skin: Reduce 1 Next |
Not assigned |
Onion Skin: Reduce 1 Previous |
Not assigned |
Within each window panel in Toon Boom Harmony are a range of different toolbars, with different buttons. These can be configured to show different buttons, and some buttons aren't assigned by default.
By default, the Camera View and Drawing View toolbars have four onion skin buttons assigned, along with the Top Light settings button. The tools toolbar has the Show Onion Skin button assigned.
Toolbar button |
Assigned by default? |
Show Onion Skin |
Assigned in Tools toolbar |
Onion Skin Add One Previous Drawing |
Assigned in Camera/Drawing View toolbars |
Onion Skin Reduce One Previous Drawing |
Assigned in Camera/Drawing View toolbars |
Onion Skin Add One Next Drawing |
Assigned in Camera/Drawing View toolbars |
Onion Skin Reduce One Next Drawing |
Assigned in Camera/Drawing View toolbars |
Onion Skin No Previous Drawings |
- |
Onion Skin Previous Drawing |
- |
Onion Skin Previous Two Drawings |
- |
Onion Skin Previous Three Drawings |
- |
Onion Skin No Next Drawings |
- |
Onion Skin Next Drawing |
- |
Onion Skin Next Two Drawings |
- |
Onion Skin Next Three Drawings |
- |
Every button that is not assigned refer to setting the onion skin to specific numbers of drawings ahead and behind.
That concludes this piece on the onion skin and how it works.
Return to home... |