Return to home... |
Below is an interactive Tool Properties window that will allow you to see all the options for the shift and trace tool. Hover over a button to view what it does, and click to be taken to that portion of the article.
The Shift and Trace tool is designed around mimicking a feature within traditional animation. Within traditional paper animation, you are able to move your paper around to trace an object in a different position; on the final scan of the animation, the paper returns to the original position. Shift and Trace within Toon Boom Harmony thus allows you to move drawings around, where on final render it returns to the original position unaltered.
The modern incarnation of the Shift and Trace tool specifically works within the Camera View; it does not work in the Drawing View. If you would like to see the old version of the Shift and Trace tool, labelled the Drawing Desk, please watch the below video (article coming soon)!
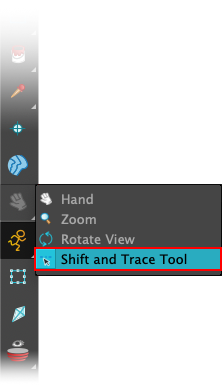
To activate the Shift and Trace tool, you can either select it by holding left click within the Tools panel and selecting the Shift and Trace tool, or by clicking in a toolbar area and selecting the Shift and Trace toolbar then clicking the relevant button.

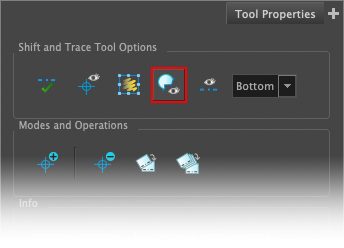
By selecting the Shift and Trace tool, you'll notice that the Onion Skin option enabled. This is because usually the Shift and Trace tool is used within conjunction with the Onion Skin; it works with both the standard Onion Skin along with the Advanced Onion Skin. As such, learn more about the Onion Skin here.
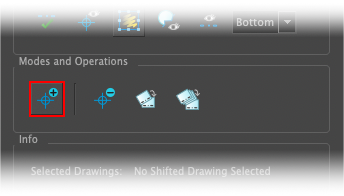
In addition to above, selecting the Shift and Trace tool also activates the second button within the toolbar (or alternatively the matching button in the Tool Properties window); this button activates the entire tool. If this button is disabled, all drawings return to their original position, and you are not able to shift drawings around.

To adjust the position of a drawing, drag anywhere on-screen within the Camera View to adjust the position.
To adjust the rotation of a drawing, either rotate it via the rotation handle, or hold down your mouse button off of a corner of the object to rotate.
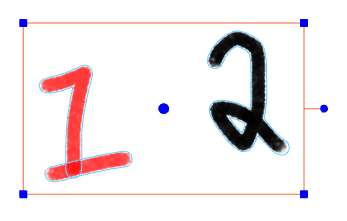
To adjust the scale of a drawing, drag out one of the blue squares to adjust scale.
To adjust the pivot position that scale and rotation take place from, drag the blue circle around to adjust the pivot point.
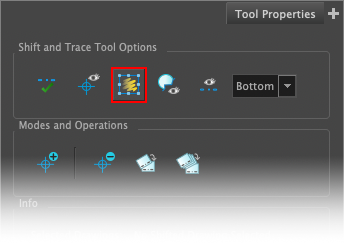
Note that to see the rotation or scale options, you must enable the Shift and Trace Manipulator button within the Tool Properties window.
Within the next section, we discuss pegs; this allows you to adjust the rotation via the rectangular peg holes found on the pegbar. This rotates the drawing around the centre circular peg hole.
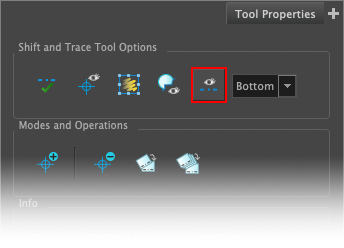
To show the pegbar, you are able to click the Show Peg Bar button within the Tool Properties window.
This shows a pegbar with the center circular peg hole, along with the rectangular peg holes. Hold down your mouse button and drag from the rectangular peg holes to adjust the rotation. This rotates the drawing around the centre circular peg hole.

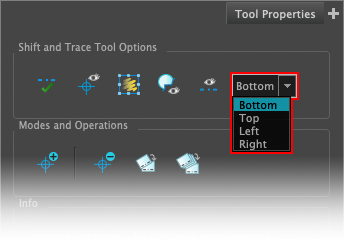
To adjust the position that the peg bar appears within, adjust the dropdown within the Tool Properties window; you are able to have a top, bottom, left and right positioned peg bar.
To select a drawing that is on a different frame, hold Ctrl (Windows) or Cmd (macOS), and click on the drawing you would like to select. This allows you to select any drawings within the current onion skin range (whether that be the standard or advanced onion skins).
If you would like to select multiple drawings, hold Ctrl/Cmd along with Shift; this will allow you to select multiple drawings. To deselect a drawing, you are able to click it again with the keyboard shortcut to deselect. You can also do the same to a drawings crosshair; learn more about crosshairs later in this article.
Sometimes it can be quite difficult to see what is selected; the Show Drawing Outline button gives an outline to your drawing to make it easy to see what frames are selected.
Note that the blue bounding box is now red; this shows multiple drawings are selected.
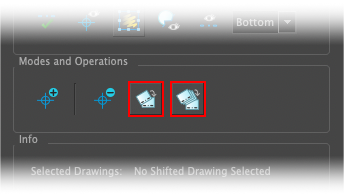
If you would like to reset the current position of the currently selected drawings, then click the Reset Shift and Trace of Selected Drawings button, found within the toolbar or the Tool Properties window. Any drawing selected will return to their default position.
If you would like to reset the position of all drawings on the currently active layer, click the Reset Shift and Trace of All Drawings button, found within the toolbar or the Tool Properties window. This only applies to the current layer; other layers are unaffected.

If you want a marker that appears on every drawing, you can utilise crosshairs. These appear within the same place on every drawing on that layer, and is shifted with the drawing.
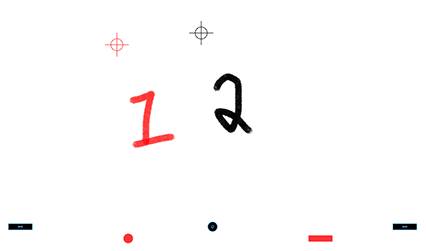
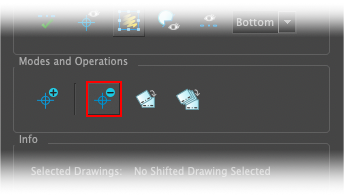
With the Shift and Trace tool active, toggle the Add Crosshairs Mode button, found either within the toolbar or the Tool Properties window. This enters a mode where any mouse click will create a crosshair. By clicking, it will create a crosshair on all drawings; if a drawing has already been shifted, it will shift the crosshair automatically.

Note that if you have the Add Crosshairs Mode button toggled, it will not let you shift the drawings until you toggle it off again.
To clear these crosshairs, click the Remove Crosshairs on All Drawings button in Tool Properties, or the Clear Crosshairs button within the Shift and Trace toolbar.

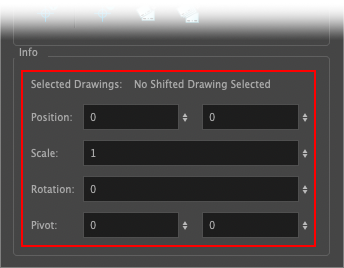
If you have a specific transform to move the drawing by, or want to see the current transform, the Info section within the Tool Properties window allows you to see and edit the current values for the selected drawing.
General |
Keyboard Shortcut |
Shift and Trace Tool |
Not assigned |
Shift and Trace: Rotate |
Not assigned |
Shift and Trace: Scale |
Not assigned |
Reset Shift and Trace of All Drawings |
Not assigned |
Reset Shift and Trace of Selected Drawings |
Not assigned |
That concludes this piece on the Shift and Trace Tool, and the additional features within. As mentioned in the introduction, if you are after the Drawing View Shift and Trace tool that is depreciated (the Drawing Desk), then please hold tight until the next article/video combo (video is at the top of this page, article coming soon)!
Return to home... |